Erin Furminsky Layered Surfaces

Erin Furminsky Layered Surfaces
Layered Surfaces Furminsky

Sunday, November 27, 2011

Documenting our learning!

See sample on P drive of expectations for blog!  There is a great example!
P drive/ teachers/student save in/ exemplar ceramics 1 blog final

Required:
1.  5 tiles/ 5 surfaces/mishima, incised, slip-trailed,water-etched
  -Describe each process
  -Temperature/cone/ of bisque firing and glaze (Why were certain tiles bisqued to a higher temperature?)
-Image of work created
-Reflection of what worked and what didn't
-What process did you relate most to as the maker (artist)?
-How did you incorporate what you learned into the work you created in the future?

2. Drape Mould 1
Decribe the process!
What were the requirements for this project?  (Criteria that must be met in order to receive a 4?)
What worked?  What didn't?
If you were to make the project over what would you do differently?
What did you learn!
Complete sentences!  Use spellcheck please!

Drape Mould 2-
Review questions above!

Drape Mould 3-
Review questions above!

Throwing process!
Steps to throwing on the wheel.
Hand positions.  See P drive- Images of hand positions are there!
This is your final!  It is due on Final day!  No exceptions!  I will be figuring grades before I leave for break!  Ask questions before the deadline!  Make sure you are there for final day!

Tuesday, November 22, 2011

Saturday, November 12, 2011

Considering the Pod! What is organic?

Alice Ballard
Pods


Statement


"I loved the shape of the pod because these are the types of things I am drawn to," she says. Frequent nature walks through her neighborhood uncover a treasure trove of possibility for her work. The pods also served as a fitting inspiration for her desire to take "very small things and enlarge them," she says. "Its an old Georgia O'Keefe trick. When you change the scale, the feeling changes entirely."

Sunday, October 9, 2011

Drape Mold 2

DRAPE MOLD 2
-Space must be divided

-Pattern transfer must be used in one section
-Must have at least 4 layers
-Tissue or Wax design transfer must be used.
-Read the dry-erase board it has more details
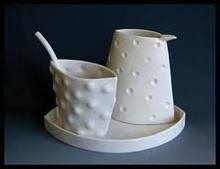
-Click on the gadget to the right and check out Erin Furminsky's layered surfaces!

Thursday, October 6, 2011

Qtr 1 Drape Mold 1 is due

Drape Mold 1 is due-
1-Focal point is evident
2-images wrap from inside to outside of form
3-Positive and negative space are used effectively
4- Linear imagery is apparent
5-variety of surface techiniques are used

Great work everyone! 

Wednesday, September 28, 2011

Surface Critique Monday!

Surface Review on Monday!
Time to move forward!  We will be celebrating our learning!  Bring your books, and, of course your work!  Lets talk about our successes and failures, and what we have learned!
Make sure to reflect and talk about the work we saw today at the Arvada Center!  Let me know if you can go to see Kristen Kieffer at the Plinth!
Keep making!

Friday, September 2, 2011

Drape Mold

We are going to be three drape molds using a variety of surface techniques. 
Watch this video!

Tuesday, August 23, 2011

5 Tiles/Surface Exploration

Create five tiles using the slab roller  (4x4)
-Mishima
-Water-Etched
-Sgraffito
-Slip Trailed
-Majolica

-After making 5 surface tiles, decide which two process you like the most. 
-Create a pattern using a pattern  (thin slab construction) 
-Create a tray to contain the cups

Monday, August 15, 2011

Fall Semester Pottery 1 (Period 3 and 8)

We will begin the year by getting used to working with clay.  You will start out by making your own stamp.  Then we will begin focusing on hump molds and thin slab construction.  I have been busy all summer learning new techniques.  I have a lot to show you!  Look forward to spending time with all of you in class! 

Lisa

Sunday, February 20, 2011

Breaking into two!

Hope everyone had a great three day weekend!
We are starting week 2 on the wheel!

Wheel Throwers

-Make sure you have scheduled a time for one on one time with me. This really helps you to get going on throwing. Many of you have already come in, and you are doing well!

-Document the throwing steps on your blog. You will have time for this on Wednesday. I will be checking blogs on Wednesday night. So let's all do this!

-Open studio will be this Saturday from 9-12 Getting extra time on the wheel practicing makes all the difference

REMEMBER WE WILL BE FIRING THE GAS KILN (REDUCTION) SOON SO GET YOUR SGRAFFITO AND WATER-ETCHED TUMBLERS GLAZED! BE SURE TO PUT GLAZED PIECE ON THE SHELVES ON THE RIGHT SIDE OF THE DOOR IN THE KILN ROOM. DON'T FORGET TO WIPE ALL OF THE GLAZE OFF THE BOTTOM OF THE PIECES, OR THEY WILL NOT BE FIRED.

HANDBUILDERS

Continue to work on your 3 organic forms

Remember you will be using 3 different kinds of glazing techniques
1. Naked Raku (This form will need terra sigillata put on it!) You will have color choices!
2. Lichen Glazes (Make sure you pick the form that goes with glaze!)
3. Crystalline Glaze (This piece will need a catcher)

Make sure you are photographing your progress and putting this on your blog!
Blogs will be checked on Wednesday night! Make sure you have them done!

Monday, January 17, 2011

Tumblers

Lets finish up tumblers!
Also, we will be setting up blogs this week!

What's due?
2 Candle Holders/1 water-etched/1 sgraffitoo2 large tumblers/water-etched/matching designs
2 large tumblers/sgraffito with matching designs

In case you missed the demonstration?
Next up slip trailing!

Wednesday, January 12, 2011

Tuesday, January 11, 2011

Intentions!

We have just finished making 3 fortune cookies with texture out of 3 different clay bodies.
Now we are making 2 mini tumblers. Thin slab construction. One should have underglaze and sgraffitto, and the other one should be water-etched.

Next up, 4 large tumblers.
2 wateretched with matching images
2 underglaze and sgraffito

Then its time for organic forms!
Half of the class will be starting wheel rotation 1!